BAD INSTALLATION
Four things were not done right
 |
1- Property was sloping towards the house instead of away from it.
2- No signs that waterproofing of the the foundation walls extend up to finish grade.
3- Nails used in the Ramset (nail gun) for fastening the window well to the foundation wall were too short.
As a result the window well is not fastened to the wall and pulling away from it. Also, A large chunk of concrete broke away from the foundation wall.
4- No signs of a seal between well and foundation wall (not required by code)
For more information on what can go wrong with window wells go to Window Well Problems and Solutions. |
|
| Window Well Installations |
|
|
|
|
BEFORE DOING ANYTHING READ THIS:
FROST WARNING!
Footings for the house have been installed 4-6 feet (1.2 - 1.8 m) below grade to prevent frost heaving. Contact your local building department to find out what the required depth for footings is in your area. If there is not enough distance between the bottom of the proposed window well and the home's footings, discuss with the department your options of protecting the footings from frost heaving. This would also be a good time to ask if a building permit is required. |
If the bottom of your window is below the adjacent ground, as in basement windows, you will need a window well. The most common type is the pre-manufactured corrugated metal window well. Sometimes they are constructed of materials such as concrete, concrete block or pressure treated lumber.
Corrugated steel window wells are most commonly used mainly because they are inexpensive and easy to install. They are also strong thanks to the ribs while the flanges on each side are used to attach the window well to the foundation wall. Regular and egress window wells are available in many sizes or can be custom made.
This short article explains how to install a window well.
(If you want to add a window well drain you will have to dig a hole all the way to the weeping tile for a proper connection or you can dig a hole for just the window well as described below. Then, with a long auger, a hole for the drain will be drilled. In this scenario the drain cannot be connected to the weeping tile but ends at the gravel covering the weeping or perimeter drain pipe. For more information go to Installing a Window Well Drain.
You can also save a bundle by not installing a window well drain and still be able to keep water from filling the well and seeping into the basement through the basement window. For more on this go to "Unclog an Exsisting or Install a New Window Well Drain?")
 |
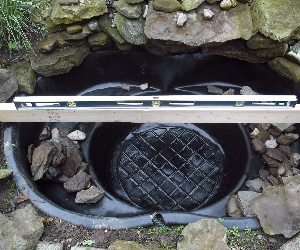
No, we are not installing a pond! This picture, taken for one of my pond articles, is to show you how to level a window well, side to side, that is wider than the length of your level with the help of a straightedge.
A straightedge is is a long piece of lumber that is straight and free of curves. |
|
|
|
HEIGHT ABOVE FINISHED GRADE
WIDTH AND DEPTH OF WINDOW WELL
Before you can figure out how deep the window well should be you have to know where the finished grade is. Also make sure that there is a slope of 1" per foot for 10 feet (25 mm per 300 mm for 3 m).
Calculating the height of the well.
Measure the distance from four inches (10 cm) above finished grade to eight inches (20 cm) below the window sill to get the well height.
Calculating the width of the well.
The width of the well should be 8 inches (20 cm) wider than the window opening. Wider is OK but if you go less than 4" (10 cm) on each side there is a possibility that the concrete will break away when installing the window well.
EXCAVATING THE HOLE
Place the window well against the house and mark a six inches (15 cm) perimeter as a guide for digging the hole.
Clean the newly exposed foundation wall and apply more waterproofing. Even if the original waterproofing looks good, still do it. The added layer will protect it from possible damage caused by the gravel backfill. Dig the hole four inches (10 cm) deeper than what is required for the installation of the well.
SECURING THE WINDOW WELL TO THE HOUSE
Cover the bottom of the hole with four inches (10 cm) of gravel. Place the well in position on the gravel bed and check for level from side to side. If the well is wider than the length of your level place it on a straight edge. Once in place mark the position of the mounting holes. Remove the well, drill the holes, apply a few coats of asphalt mastic and install the well. The window well can be secured to the foundation wall using Tapcon screws or lag bolts and lead shields. Apply any leftover mastic on the mounting flange and mounting hardware to seal the joint as much as possible.
BACK-FILL
Outside well: Back-fill with soil a few inches at the time, tamp the soil as you back-fill. A sledge hammer (held vertically and head down) makes an excellent temper. You can also use a piece of 2x4 lumber or a crowbar (rounded end down).
Inside well: To assist drainage fill the entire window well with gravel up to four inches (20 cm) below the window sill.
Once the well is installed it may be a good idea to install a clear window well cover to keep out debris and rain. A cover is required for all areas where there is foot traffic (side walks, driveways, etc.) or where kids are playing. |
|
|
|
|
Back to Top |
|