 |
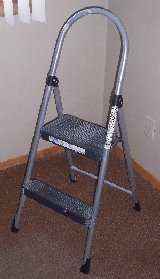
| This step stool doesn't take up much floor space but is tall enough for cutting in along the ceiling. |
|
| Drywall compound, my preferred choice of material for filling in nail holes. |
|
| 1 1/2" and 3" (38 and 75 mm) putty knives and 11 1/2" (290 mm) trowel for applying the drywall compound. |
|
Surface Preparations
no paint job will last without it |
|
|
It doesn't matter how well a house is built, it will fail and crumble without a proper foundation. The same holds true for painting. You can purchace the best paint brushes and rollers money can buy, you may be the best painter in the world, but without properly cleaning and preparing the surface prior to painting, paint will not last as long as expected and even may chip or peel.
- Never painted surfaces.
- Previous painted surfaces.
- Preparing walls after removing wallpaper
- Treating mildew.
- Links to other helpful articles.
NEVER PAINTED SURFACES
For all new construction the number one task is to do a thorough cleaning of all surfaces to be painted. During construction there is a lot of saw dust and compound sanding dust generated that to will cover newly installed wood trim and drywall (also know as gypsum board or wallboard).
- Remove all dust particles from surfaces to be painted.
- Make sure the wall is completely dry before starting to paint.
- Use a high quality primer-sealer on all porous materials such as wood, drywall and concrete. A primer acts as a bonding agent which allows paint to stick better to walls, trim, etc. A primer also helps the new paint to go on smoother, increases durability and creates a flatter surface for the finishing or top coat.
PREVIOUS PAINTED SURFACES
Removing old paint is messy, time consuming and, depending on type used, harmful to the environment.
- If the trim has a glossy finish you should remove some or most of the sheen with regular or liquid sandpaper. Liquid sandpaper is not a paint stripper, it just removes some of the sheen of the old paint so that the new paint will adhere or bond better.
- Preparations for previous painted surfaces are in many ways the same as for never painted surfaces. All surfaces should be sound and clean before painting.
- Loose and peeling paint should be removed by sanding, scraper or wire brush. I would not recommend the use of a power washer as it can damage the surface. If you still want to use a power washer read and follow the manufacturer's recommendations and warnings.
- Do not use sandpaper on old paint that may contain lead. Paint dust containing lead is a health hazard.
- Dirt or grease should be removed with soap and water, household cleaner or trisodium phosphate, better known as TSP.
- Rinse all cleaned surfaces thoroughly and allow them to dry completely.
- Apply a primer or finishing coat. The jury is out on whether or not to prime previous painted surfaces or not. Personally I think applying a primer will increase adhesion of the finishing coat and increases its durability. |
|
|
PREPARING WALLS AFTER REMOVING WALLPAPER
After the wallpaper has been removed there still could be wallpaper glue on the walls. It is important to remove as much as possible. Any glue left on the walls could bleed right through the paint. During my 28 years inspecting homes I have seen many painted walls where the wallpaper glue had bled right through the paint. After the paper was removed my walls were covered in wallpaper glue and fabric softener which was used to soak the paper before stripping. There may be several ways of removing old glue before painting but this is what worked well for me.
- I washed the walls twice with just hot water. It was not a bad job because the fabric softener had made the glue saturated and soft. After the walls were cleaned I made sure all surfaces were completely dry.
- I lightly sanded the walls with regular sandpaper to remove any small bumps and small pieces of wallpaper backing that was missed when stripping the paper.
- Next I used Kilz Original to prime the walls. This primer/sealer is often used in fire restoration projects. It seals just about anything including smoke damaged surfaces, wallpaper glue and nicotine covered walls and ceilings. Kilz Original can even be used as a primer on varnished kitchen cupboard doors before painting; just make sure to scuff sand before applying the primer.
MILDEW - TREAT OR REPLACE AFFECTED AREAS
Minor mildewed ares can be treated with a mixture of one part household bleach and three parts water. If the affected area is larger and/or shows signs of surface damage, it is recommended to make proper repairs. Often mildew will form when personal belongings are stored against outside walls leaving no room for air circulation. Instead of using household bleach you can also try a commercial mildew remover. If you do, read the manufacturers instructions and wear rubber gloves, goggles, long-sleeved shirt and long pants to protect eyes and skin when using the product.
LINKS TO OTHER HELPFUL ARTICLES
Oil or latex? How to test old paint. Advantages, disadvantages.
Tools and supplies. For surface preparation and painting.
Buy the right brush or roller. Bristles, roller material, nap length.
Liquid sandpaper - deglossers. What it is. What it doesn't do.
Painting tips. Getting ready. Tools. Painting. Storing paint.
Paint Tray Liners. Make your own. Do you really need one?
Clean-up time. Brushes, rollers, trays, solvents, paint disposal.
Lead in paint. Health warning. Remedial action. Government.
Lead. Sources of lead other than paint. Remedial actions. Health concerns. |
|
|
|
|
Back to Top |
|